
In my previous career as a tile contractor and quality control consultant, I’ve managed well over 1,500 projects in the DC/MD/VA area. Spanning over a decade – working closely with labor, design, and building professionals, I’d like to think I’ve seen just about everything in this industry; the good and the bad.
In the world of construction, evolution is a constant. New products and improved technology help promote increased efficiency and predictability of the finished system. From early design to final closeout, every step of the process is carefully measured and executed. The construction process requires this level of detail because as with anything else, the process is only as strong as its weakest link.
Obviously, this isn’t anything new. So, why am I standing on a soapbox and voicing this seemingly ubiquitous statement? Because, “knowing” and “doing” are completely different actions. That said, let’s bring this discussion to the world of tile.
The evolution of tile sizes has been significant in various industries, including architecture, interior design, and construction. Tiles are commonly used for flooring, walls, and various surfaces, and their size has evolved over time due to factors such as aesthetics, technological advancements, practicality, and design trends. From an aesthetic standpoint, today’s tile has much more range and versatility. Offerings include a limitless assortment of geometric shapes, textures, colors, patterns, and design possibilities. At the same time, tile performs like never before. Technology allows for denser, stronger, and less absorbent tiles. Many tiles can withstand annual freeze/thaw cycles and are nearly impervious to moisture and water. Tile has become the “go-to” hard finish for commercial interior and exterior applications.
Let’s also talk about tile size. Advancements in production and technology allow for larger and larger tile sizes. In my early years, 12”x12” size tiles were considered “large format.” It’s true! My crews would complain about installing anything larger than 8”x8″! Of course, they adapted and accepted the fact that tiles were evolving to larger sizes. These days, 24”x24″ and 8”x48” are the industry norm, and 12”x24”s are considered a commodity.
Here’s an overview of how tile sizes have evolved:
In summary, the evolution of tile sizes reflects technological advancements, design preferences, and construction methods over time.
So, what is the point of explaining all of this? You may be wondering when I will get around to the topic of spot bonding. I’m getting there, but I needed to provide that brief history lesson for it all to make sense. As mentioned earlier, the construction system process is only as strong as its weakest link. Specific to tile, all the components that make up a finished tile system must be appropriate and installed correctly – per industry standards and methods. Any shortcut or misstep in this process will manifest in a faulty product. As tile manufacturing has evolved, so have the means and methods of installation.
In my experience, one of the main drivers that can make or break this system is the application of the mortar. For the purposes of this conversation, let’s stick to thinset mortar.
As tiles become bigger and bigger, large segments of the labor force struggle to keep up with the technical installation skills required. Factor in the new generation of “user-friendly” thinset products now widely available, and the chances of encountering improper installation methods skyrocket, knowingly or unknowingly. One of the most common issues with improperly installing large format tiles is by way of spot-bonding.
Spot bonding is not a recognized method of installing any tile (no matter the size). Unfortunately, this method has become so prevalent that it’s considered one of the leading factors when large tiles crack, break, and de-bond.
Spot bonding or “five-spotting” is placing globs or daubs of mortar on the back of the tile, typically at the corners and the center (five-spotting). This method is a ticking time bomb for failure and no longer becomes a question of “if” it will fail but “when.” This method does not fully support or bond the mortar to the substrate. Also, spot-bonding does not follow any established and proven installation methods, nor does the Tile Council of North America acknowledge it.
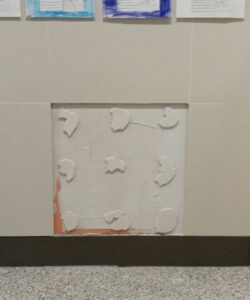
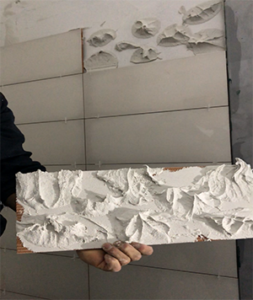
The simple answer is that it’s easier and faster; place daubs of mortar on the backside of the tile and push into position until it’s flush with the adjacent tiles. Shortcutting like this typically means the contractor has eliminated substrate prep (which we all know is mandatory, not optional) and has likely avoided any conversation regarding lippage. Even when a tile contractor is under tight deadlines and aggressive timelines, spot bonding should never come into play.
Note the word, “major” in the above header. MAJOR problems with spot-bonding include:
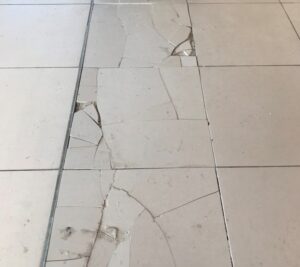 pported weight (gasp!), ultimately leading to damaged tiles.
According to the ANSI Specifications, Section A108.5-2.2.2 describes the approved method for installing floor and wall tile as follows:
“Apply mortar with flat side of trowel over an area no greater than can be covered with tile before the mortar skins over. Using a notched trowel of type recommended by mortar manufacturer, comb mortar to obtain even setting bed without scraping backing material. Cover surface uniformly with no bare spots and with sufficient mortar to insure a minimum mortar thickness of 3/32” (2 mm) between tile and backing after tile has been beaten into place. Tile shall not be applied to skinned-over mortar.”
Using the above ANSI method, the mortar is keyed into the entire substrate resulting in an excellent mechanical bond with minimum voids.
Tile installation methods will forever evolve and change. Newer technology in thinset, grout, and membranes continue improving the process. However, spot bonding, in any form, is not a recognized method of tile installation and should never be used. Always follow the recommendations of ANSI A108 for all tile installation methods.
Lastly, write in the tile specification that spot bonding is not an acceptable installation method for your next project.
As always, send any questions or comments to our QA&T Team – we are here to help.